Ever wondered how maglev trains float effortlessly above their tracks?
Or why some electric motors are incredibly efficient?
The secret lies in a fascinating magnetic arrangement called a Halbach array.
How to make a halbach array is simpler than you might think. This unique configuration of permanent magnets creates a powerful magnetic field on one side while virtually canceling it out on the other side.
Here’s the deal:
Building your own Halbach array is totally doable with the right materials and approach. And in this guide, I’ll walk you through the entire process step-by-step.
Sound good? Let’s dive in.
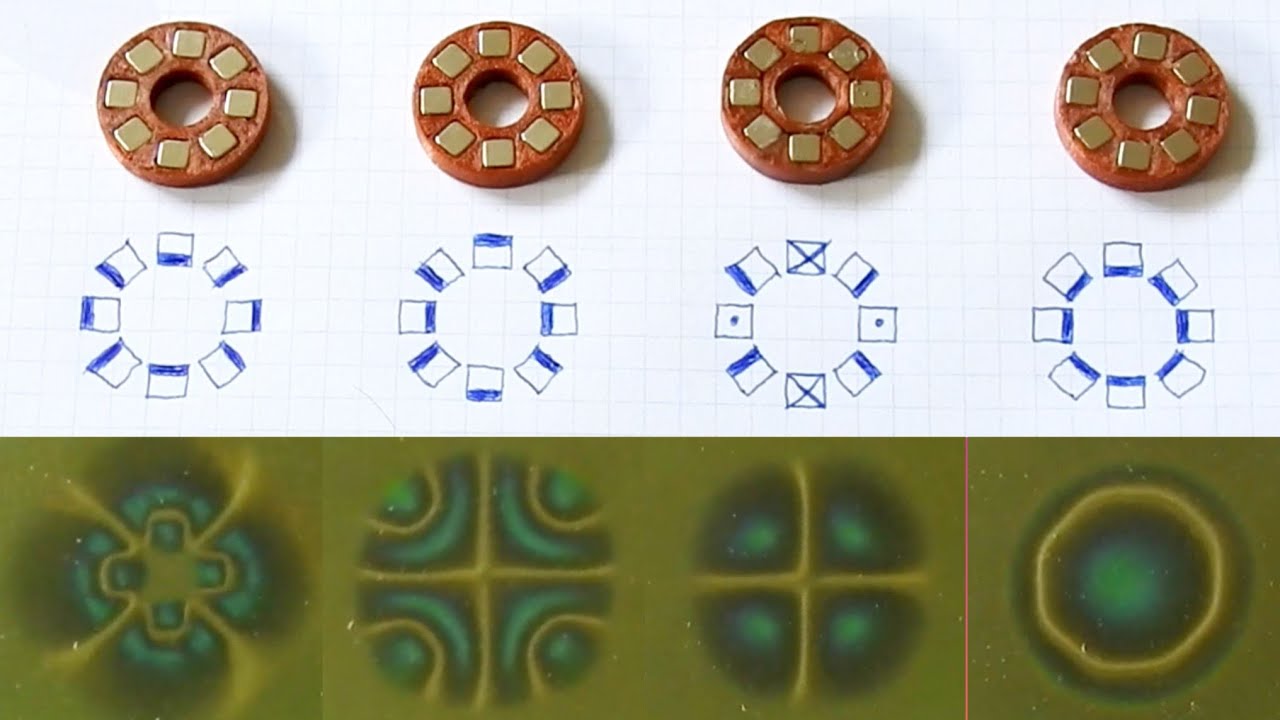
Table of Contents
What Is a Halbach Array?
Before we get into the nitty-gritty of construction, let me explain what we’re actually building.
A Halbach array is a specific arrangement of permanent magnets where each magnet’s orientation rotates relative to its neighbors.
This creates what physicists call “one-sided flux.”
The magnetic fields constructively interfere on one side of the array while destructively canceling on the opposite side.
Pretty cool, right?
The concept was first described by physicist Klaus Halbach in the 1980s while working at the Lawrence Berkeley National Laboratory.
And it has since become a cornerstone of modern magnet technology.
Why Halbach Arrays Matter
These magnetic configurations aren’t just a scientific curiosity.
They have real-world applications that impact everything from:
- Maglev trains: Halbach arrays enable trains to levitate and move with minimal energy loss
- Electric motors: By concentrating the magnetic field, they improve efficiency and power density
- Medical imaging: MRI machines use Halbach arrays to create uniform magnetic fields
- Magnetic levitation systems: Reducing drag and improving overall efficiency
The bottom line?
Halbach arrays demonstrate the power of thoughtful magnetic design.
Essential Materials for Building a Halbach Array
Here’s what you’ll need to get started:
Magnet Selection
Neodymium magnets are the gold standard for Halbach arrays.
Specifically, look for:
- Grade N42 or higher for good performance
- N52 grade for maximum field strength
- Consistent dimensions across all magnets (±0.1mm tolerance)
- High coercivity rating (minimum 12 kOe) to resist demagnetization
I personally recommend starting with 1-inch cube magnets for your first project.
They’re easier to handle and the results are clearly visible.
Construction Hardware
You’ll also need:
- Non-magnetic framework: Aluminum angle brackets or 3D-printed ABS plastic holders
- Assembly jig: Custom-built positioning fixture (essential for handling magnetic repulsion)
- Structural epoxy: Rated for metal bonding
- Measurement tools: Digital gaussmeter and magnetic field viewing film
Safety Equipment
This is SUPER important:
- Heavy-duty work gloves: To prevent pinching injuries
- Safety glasses: Impact-resistant eyewear
- Non-magnetic tools: Brass or aluminum implements only
- First aid kit: Including tweezers for magnet-related injuries
Pro Tip: Clear all metal objects from your workspace before you start. Trust me on this one.
Critical Safety Protocols
Strong permanent magnets pose genuine hazards that demand respect.
Personal Safety Measures
- Clear all metal objects from your workspace and person
- Maintain 50-100mm minimum distance from electronic devices
- Never allow magnets to slam together—they’re brittle and will shatter
- Keep fingers clear of pinch points between magnets and ferromagnetic materials
Medical Considerations
People with pacemakers, defibrillators, or metal implants must avoid the work area entirely.
Remove watches, jewelry, and metal-framed glasses before handling magnets.
Here’s the thing:
These aren’t your average refrigerator magnets. Neodymium magnets can exert forces exceeding 100N between adjacent elements.
Step-by-Step Guide: Building a Linear Halbach Array
Now for the fun part.
Let’s walk through building a basic 4-magnet linear Halbach array.
Step 1: Create the Assembly Jig
This is non-negotiable.
Without a proper jig, magnetic repulsion makes assembly nearly impossible.
Build a non-magnetic fixture with slots to hold magnets in precise positions.
You can either:
- Machine aluminum channel
- 3D-print ABS plastic guides with magnet-sized recesses
The jig should hold your magnets firmly while allowing you to rotate each one independently.
Step 2: Mark Magnet Orientations
Before assembly, clearly label each magnet’s poles using permanent marker.
Create a reference chart showing the rotation sequence:
- Magnet 1: North-up
- Magnet 2: North-right (90° rotation)
- Magnet 3: North-down (180° rotation)
- Magnet 4: North-left (270° rotation)
This pattern creates the rotating magnetization that’s essential for the Halbach effect.
Step 3: Sequential Assembly Process
Install magnets one at a time in your jig:
Start with magnet #1 in North-up orientation.
Add magnet #2 with North pointing right (90° rotation from the first).
Continue the pattern: North-down for #3, North-left for #4.
Each subsequent magnet continues the 90° rotation sequence.
But here’s the tricky part:
The magnets will want to repel each other. This is where your assembly jig becomes crucial.
Step 4: Securing the Assembly
Once positioned correctly, apply structural epoxy to lock magnets in place.
Work quickly—you have limited time before the adhesive sets.
Ensure magnets remain properly oriented during curing.
I recommend using tape to keep them compressed while the glue sets completely.
Step 5: Verification Testing
Use magnetic viewing film to visualize the field pattern.
You should observe:
- Strong field concentration on one side
- Minimal field on the opposite side
- Clean boundaries between the active and inactive areas
Measure field strength with a gaussmeter at standardized distances (10mm, 25mm, and 50mm).
Well-constructed arrays typically achieve 2-3x stronger fields on the active side compared to conventional magnet arrangements.
Advanced Halbach Array Designs
Once you’ve mastered the basic linear array, you can explore more sophisticated configurations.
Circular Arrays
Circular arrays require more precision but offer superior performance for focusing applications.
For a 12-magnet k=1 array:
- Position magnets every 30° around the circle
- Orient magnetization direction rotating 60° between adjacent magnets
- Ensure consistent radial positioning for field uniformity
The focusing efficiency depends on geometric precision.
You should achieve 80-90% of the theoretical maximum field concentration with careful construction.
Planar Arrays
Two-dimensional Halbach arrays arrange magnets in a flat configuration.
These are often found in:
- Magnetic levitation (Maglev) systems
- Some magnetic sensors
- Specialized motor applications
The general principle of rotating magnetization direction remains the same regardless of the shape.
Performance Optimization Tips
Magnet Count vs. Performance
More segments create smoother field distributions but increase complexity and cost.
The practical sweet spot for most applications is 8-12 elements, balancing performance with manufacturability.
Demagnetization Prevention
Select magnets with coercivity ratings exceeding the demagnetizing fields they’ll encounter.
This is particularly critical in high-performance arrays where adjacent magnets create strong opposing fields.
Temperature Considerations
Neodymium magnets lose approximately 0.12% strength per degree Celsius.
For temperature-sensitive applications, consider:
- Samarium cobalt magnets for high-temperature stability
- Temperature compensation circuits in electromagnet hybrids
- Thermal management systems for cooling
Common Mistakes to Avoid
Asymmetric Field Distribution
Usually indicates incorrect magnet orientation.
Remove and reinstall the offending element with proper pole alignment.
Lower Than Expected Field Strength
Often results from:
- Partial demagnetization during assembly
- Excessive air gaps between magnets
- Using lower-grade magnet material than specified
Structural Integrity Problems
Magnetic forces can exceed 100N between adjacent elements.
Ensure your support structure and adhesive can handle these loads without flexing or failure.
The bottom line?
Pay attention to the details. Small mistakes in orientation or spacing can dramatically impact performance.
Testing and Quality Control
Field Measurement Protocol
Establish a standardized testing procedure:
- Measure field strength at 10mm, 25mm, and 50mm distances
- Map field distribution across the active surface
- Compare results to theoretical calculations
- Document any deviations for troubleshooting
Visual Field Verification
Magnetic viewing film provides immediate qualitative assessment.
Proper arrays show:
- Sharp field boundaries between active and inactive sides
- Uniform intensity across the active surface
- Minimal field leakage on the null side
Real-World Applications and Performance
Well-constructed Halbach arrays typically achieve:
- Field enhancement ratio: 2-3x stronger on active side compared to conventional arrangements
- Field suppression: 90-95% reduction on inactive side
- Efficiency improvement: 20-40% in motor applications
Common applications include:
- Magnetic levitation systems: Reducing drag and improving efficiency
- Brushless motor rotors: Increasing power density
- Magnetic bearings: Enabling frictionless rotation
- Scientific instruments: Creating uniform magnetic environments
Maintenance and Long-term Considerations
Periodic Inspection
Check for:
- Magnet position drift due to thermal cycling
- Adhesive degradation from temperature or chemical exposure
- Physical damage from impacts or handling
Performance Monitoring
Establish baseline measurements and periodically verify field strength maintenance.
Significant degradation may indicate magnet demagnetization requiring element replacement.
Scaling and Customization
Once you’ve mastered basic arrays, consider advanced configurations:
- Multiphase arrays for rotating magnetic fields
- Variable-pitch designs for specialized field profiles
- Hybrid electromagnet-permanent magnet systems for adjustable performance
The principles remain consistent regardless of scale—precise orientation control, quality materials, and rigorous assembly procedures ensure optimal results.
Conclusion
Building a Halbach array demands attention to detail and respect for safety protocols.
But the resulting magnetic configurations offer capabilities impossible with conventional arrangements.
How to make a halbach array comes down to understanding the fundamental principle: rotating magnetization creates asymmetric magnetic fields.
Whether for research, education, or practical applications, these remarkable devices demonstrate the power of thoughtful magnetic design.
The key takeaways:
- Start with quality neodymium magnets
- Use proper safety equipment
- Build a precise assembly jig
- Follow the 90° rotation pattern religiously
- Test your results thoroughly
With careful planning and execution, you’ll create a magnetic array that showcases one of the most elegant principles in modern physics.