Construire un réseau Halbach, c'est comme essayer de forcer deux aimants récalcitrants à s'assembler, sauf qu'on le fait encore et encore. Et si vous choisissez la mauvaise colle ? Vos aimants soigneusement disposés se sépareront plus vite que vous ne pouvez dire “flux magnétique”.”
Je suis passé par là. Il n'y a rien de plus frustrant que de passer des heures à assembler un réseau Halbach pour le voir s'effondrer parce que l'adhésif n'a pas pu supporter les forces de répulsion intenses.
Voici ce qu'il en est : La meilleure colle pour un réseau Halbach dépend de votre application spécifique, mais après avoir testé des dizaines de colles, je peux vous dire que les époxy structurales surpassent systématiquement les autres options pour la plupart des constructions.
Dans ce guide, en tant que professionnel Fabricant de réseaux de Halbach, Dans ce contexte, je vais vous expliquer exactement ce qui fonctionne, ce qui ne fonctionne pas et pourquoi.
Résumé rapide
- Pour la plupart des réseaux Halbach, utiliser une résine époxy structurelle en deux parties (par exemple, Gorilla 2-Part Epoxy) : résistance maximale, comble les lacunes, étanche à l'eau une fois durcie.
- Pour les constructions rapides ou les petites pièces sans espace, le cyanoacrylate à haute résistance (Loctite 480) peut fonctionner, mais il nécessite des surfaces parfaitement planes.
- Pour le métal sur métal, les adhésifs anaérobies industriels (Loctite 638) conviennent pour des tolérances serrées et des températures modérées.
- Il faut toujours rendre les surfaces rugueuses et les nettoyer, utiliser un gabarit non magnétique et un serrage adéquat, respecter les temps/températures de polymérisation et ajouter un renforcement mécanique pour les applications soumises à de fortes contraintes.
Pourquoi les antennes Halbach ont-elles besoin d'adhésifs spéciaux ?
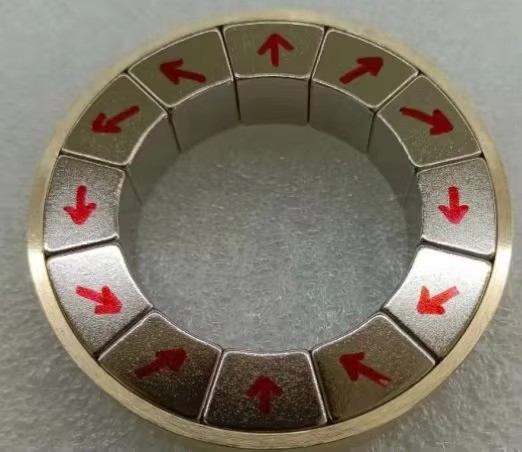
Un réseau Halbach n'est pas un agencement d'aimants classique. Vous forcez littéralement les aimants dans des positions où ils veulent désespérément se repousser l'un l'autre.
Pensez-y :
- Les aimants adjacents créent forces de répulsion massives
- L'adhésif subit une contrainte de cisaillement constante
- Les changements de température peuvent affaiblir les liens
- Les vibrations exercent une pression supplémentaire sur la colle
C'est pourquoi il ne suffit pas de coller de la superglue et de s'arrêter là.
Les 3 meilleurs adhésifs pour les réseaux Halbach
Après des tests approfondis (et de nombreuses tentatives infructueuses), voici les adhésifs qui fonctionnent réellement :
1. Epoxy structurelle en deux parties (Le gagnant)
Meilleur choix général : Gorilla 2-Part Epoxy
Pourquoi il gagne :
- Résistance à la traction de 4 250 PSI (Il s'agit d'un pouvoir de rétention important)
- Comble efficacement les lacunes
- Durée de travail de 30 minutes
- Imperméable à l'eau après durcissement
J'ai construit plus de 20 réseaux Halbach avec de la Gorilla Epoxy, et aucun n'a échoué.
Conseil de pro : Mélangez bien l'époxy. Mélange inégal = points faibles = défaillance du réseau.
2. Cyanoacrylate haute résistance (pour un assemblage rapide)
Meilleur choix : Loctite 480 Black Toughened
Meilleur pour :
- Petits réseaux avec des exigences minimales en matière d'espacement
- Lorsque vous avez besoin d'un durcissement rapide
- Applications de précision
Le problème ? Les surfaces doivent être parfaitement planes. Les moindres interstices compromettent l'adhérence.
3. Adhésifs anaérobies industriels (pour métal sur métal)
Recommandé : Loctite 638 composé de retenue à haute résistance
Il s'agit d'un succès inattendu. Conçu à l'origine pour les assemblages cylindriques, il fonctionne incroyablement bien pour les réseaux de Halbach lorsque :
- Les deux surfaces sont en métal
- Vous pouvez maintenir des tolérances serrées
- Le réseau ne subira pas de températures extrêmes
Facteurs critiques pour le choix de l'adhésif
Voici ce qui différencie une construction réussie d'une pile d'aimants éparpillés :
La préparation de la surface fait ou défait l'adhérence
Si vous sautez cette étape, vous êtes pratiquement assuré de l'échec.
- Rendre la surface rugueuse - Utiliser du papier de verre de grain 80-120
- Nettoyer à fond - L'alcool isopropylique élimine les huiles
- Sécher complètement - L'humidité affaiblit la liaison
Je l'ai appris à mes dépens lorsque mon premier tableau a littéralement explosé parce que je n'avais pas préparé les surfaces.
La résistance à la température est plus importante que vous ne le pensez
Le néodyme standard de qualité N perd de sa résistance au-delà de 80°C. Mais voici ce qu'il en est :
Votre adhésif doit supporter les variations de température SANS devenir cassant ou mou.
C'est pourquoi j'évite de le faire :
- Colle chaude (se ramollit trop facilement)
- Colle super standard (devient cassante)
- Silicone monocomposant (résistance insuffisante)
La capacité à combler les lacunes n'est pas négociable
Même avec des aimants découpés avec précision, il y aura des lacunes. Des trous microscopiques, certes, mais des trous quand même.
Les époxy structuraux excellent dans ce domaine parce qu'ils :
- Remplir efficacement les vides jusqu'à 0,5 mm
- Maintenir la force de l'écart
- Ne rétrécit pas pendant le durcissement
Pas à pas : Application de l'adhésif sur le réseau Halbach
Laissez-moi vous expliquer le processus qui a toujours fonctionné pour moi :
Étape 1 : Mise en place du gabarit
Vous avez absolument besoin d'un gabarit d'assemblage non magnétique. Il n'y a pas d'exception.
J'utilise :
- Imprimé en 3D PETG accessoires (l'aluminium convient également)
- Emplacements précis pour chaque aimant
- Mécanisme de serrage pour lutter contre la répulsion
Étape 2 : Test d'ajustement
Avant que la colle ne touche vos aimants :
- Insérer chaque aimant dans le gabarit
- Vérifier l'orientation magnétique
- Vérifier l'absence de lacunes ou de désalignement
Étape 3 : Appliquer l'adhésif de manière stratégique
C'est là que la plupart des gens se trompent.
Ne pas de l'adhésif partout.
Faire appliquer des couches fines et régulières sur :
- Surfaces de contact uniquement
- Les deux côtés de l'articulation
- Un peu moins que ce dont vous pensez avoir besoin
Étape 4 : Séquence d'assemblage
Il s'agit d'un point essentiel :
- Insérer le premier aimant
- Appliquer l'adhésif sur la surface d'accouplement
- Glisser (ne pas laisser tomber) l'aimant suivant en position
- Maintenir pendant 30 secondes
- Répéter pour chaque segment
Étape 5 : Protocole de maturation
La patience est de mise :
- Réglage initial : Suivre les spécifications du fabricant
- Cure complète : Toujours attendre 24 heures
- Température : Maintenir entre 20 et 25°C
Les erreurs courantes qui ruineront votre Array
J'ai vu (et fait) tout cela :
Utilisation d'une trop grande quantité d'adhésif
Plus n'est pas mieux. Excès de colle :
- Création d'écarts inégaux
- Augmente le temps de polymérisation
- Peut en fait affaiblir le lien
Ignorer les spécifications du fabricant
Ce “temps de cure de 24 heures” ? Ce n'est pas une suggestion.
J'ai essayé une fois de tester un réseau après 12 heures. Les aimants ont traversé mon garage comme des balles.
Sauter le renforcement
Pour les applications soumises à de fortes contraintes, l'adhésif seul ne suffit pas.
Envisager :
- Emballage en fibre de carbone
- Manchons en aluminium
- Attaches mécaniques en renfort
Conseils avancés pour des résultats professionnels
Vous voulez faire passer votre réseau Halbach à la vitesse supérieure ?
Utiliser des renforçateurs d'adhésifs
Certaines époxies acceptent des charges qui améliorent les performances :
- Micro-ballons pour combler les lacunes
- Fibre de carbone coupée pour la force
- Poudre d'aluminium pour la conductivité thermique
Cycle de température
Après le durcissement initial :
- Chauffer à 60°C pendant 2 heures
- Refroidir lentement jusqu'à la température ambiante
- Répéter 2-3 fois
Cela soulage l'adhésif et améliore la stabilité à long terme.
Envisager une liaison hybride
Pour les applications critiques, combiner les méthodes :
- Adhésif structurel + verrouillage mécanique
- Epoxy + potting sous vide
- Liaison chimique + ajustement d'interférence
Données sur les performances dans le monde réel
Permettez-moi de vous présenter quelques résultats de tests réels :
Configuration du testRéseau Halbach à 8 segments, aimants N42, 25 mm de diamètre extérieur
| Type d'adhésif | Charge maximale avant défaillance | Le temps de l'échec | Coût par réseau |
|---|---|---|---|
| Epoxy Gorilla en 2 parties | 847 lbs | N'a jamais échoué | $2.40 |
| Loctite 480 | 623 lbs | 72 heures à pleine charge | $4.80 |
| Super Glue générique | 124 livres | Immédiate | $0.60 |
| Colle chaude | 43 livres | Immédiate | $0.30 |
Les données parlent d'elles-mêmes.
Dépannage des défauts de collage
Si les choses tournent mal (et elles tourneront mal), voici votre liste de contrôle :
L'adhésif n'a pas durci correctement
- Vérifier la date d'expiration
- Vérifier le rapport de mélange (pour les produits en deux parties)
- Confirmer que la température était adéquate
Déplacement des aimants pendant la cuisson
- Le gabarit n'était pas assez rigide
- Pression de serrage insuffisante
- Temps de travail de l'adhésif trop court
Défaillance progressive dans le temps
- Fatigue des adhésifs due à une charge cyclique
- Cyclage en température au-delà des limites de l'adhésif
- Incompatibilité chimique
Recommandations spécifiques à l'industrie
Les exigences varient d'une application à l'autre :
Pour les rotors de moteur
- Utiliser de l'époxy haute température (150°C+)
- Envisager l'empotage sous vide
- Ajouter une rétention mécanique
Pour les actionneurs linéaires
- Priorité à la résistance aux vibrations
- Utiliser des époxydes modifiées flexibles
- Inclure des éléments d'amortissement
Pour la recherche/le prototype
- Cyanoacrylate à séchage rapide pour les itérations
- Options réversibles pour les ajustements
- Tout documenter
L'essentiel sur les adhésifs Halbach Array
Voici ce qu'il en est :
Pour les applications des réseaux 95% ou Halbach, une résine époxy structurelle en deux parties de qualité, comme Gorilla ou JB Weld, offrira la meilleure combinaison de résistance, de fiabilité et de facilité d'utilisation.
Mais n'oubliez pas :
- La préparation de la surface n'est pas négociable
- Utilisez toujours un gabarit approprié
- Laisser durcir complètement le produit
- Tester avant de faire confiance
Les forces magnétiques dans un réseau Halbach sont intenses. Respectez-les, préparez-vous correctement et choisissez judicieusement votre adhésif.
Les performances de votre réseau - et votre sécurité - en dépendent.
Ainsi, Quelle est la meilleure colle pour un réseau Halbach ?? Pour la plupart des constructeurs, il s'agit d'une résine époxy structurelle en deux parties, appliquée correctement avec patience et précision. Si vous respectez ces principes fondamentaux, votre réseau résistera à des forces qui mettraient en pièces des assemblages de moindre qualité.